Configurations for various emulated consoles may behave differently, and these configurations may even be different between games. Additionally, some systems might require an emulated mouse cursor. In order to use this with the very few games that require it, you will need not only access to a mouse or touchpad but also a Scroll Lock key. A few new ultrabooks and other extremely light portable Linux machines no longer have this key. If you’re following mednafen’s prompts on any small machine that uses an Fn key to map one key to another one, then hold this down whenever you’re pressing the requisite key. For instance, if you needed to press F2 but F2 is shared with something on your keyboard, simply push Fn and F2 together each time to restore this functionality.
Method 1: Getting Help During Games
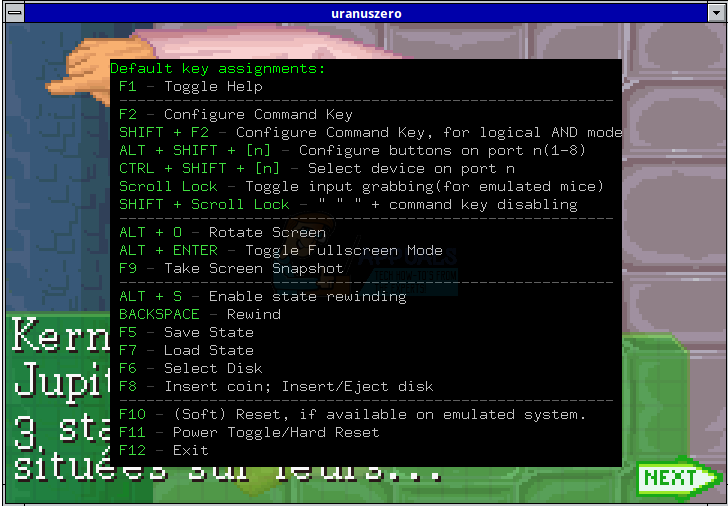
Push down the F1 key in order to bring up a help chart. This key binding was selected to ensure compatibility with many other pieces of software that have a similar binding. Keep in mind that you can’t access this help screen without already running a game. Running mednafen without a ROM file loaded will simply return you to the command line. When you do push F1, you will see a window pop over whatever emulated game is running inside your mednafen graphical window. Should you ever have a graphics problem where a save state popup or some other information screen remains behind emulated video game images, then cycling this help screen might also help to get rid of these ghost images.
This pop over merely gives a list and isn’t actually interactive, so you can push F1 whenever you want to get rid of it. It doesn’t pause the game either, so you can actually leave it open while the game opcode continues to execute. Pay special attention to the F10 binding, as some emulate systems lack a soft reset. In others, a soft reset might actually be required to continue playing certain types of games. Note that the F9 binding to take a screenshot isn’t related to the Print Screen or SysRq/ALT+Print Screen combinations used by desktop environments emulating Microsoft Windows bindings. It instead takes a screenshot and saves it straight to disk in the ~/.mednafen/snaps/ directory. This way you can actually use it even if you’re running just a window manager, like Openbox without a desktop environment.
Method 2: Setting Controls While Running Games
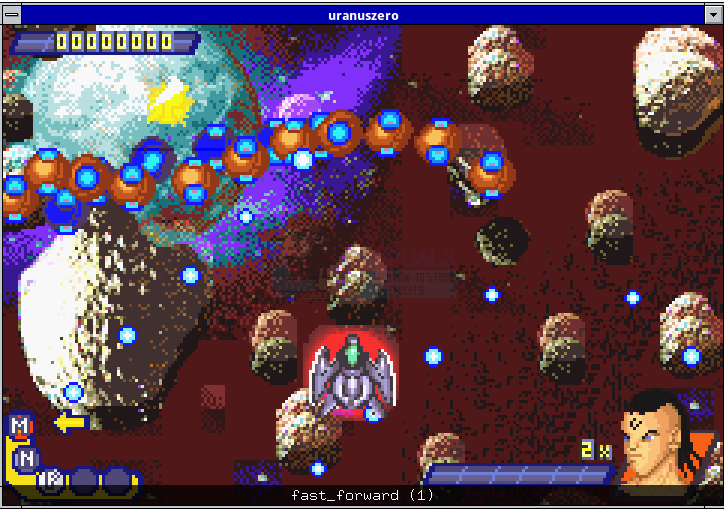
Command keys and actual game controls are configured separately in mednafen. Push F2 if you’d like to configure a command key. This is most useful to either change the F11 binding if you’re very used to that being used for maximizing windows, or for setting emulator commands to unused buttons on USB or wireless game controllers. If you’re going to do this, make sure that you have your controller attached before loading up the ROM. Once you’re ready, push F2 to receive a prompt about which command you want reconfigured. Push the key that currently does whatever it is you’re trying to do. For instance, if you wanted to set a fast forward key to your controller so you could speed up the game right from a shoulder button, then push the ` key when the prompt comes up asking you which command needs to be reconfigured.
A simple prompt at the bottom will read fast_forward (1) with no other instructions. The command would of course be different if you were configuring a different command. You have to push the key or controller button you want the command to be assigned in response to this prompt. Once it recognizes the button you wish to use it will read fast_forward (2), which is a request for you to push it a second time. It might continue more than once if there was a problem with the wireless connection when using a wireless controller, or if you pushed two separate buttons during the mapping process. Configuring controller buttons follows an almost identical procedure, simply with different command key bindings. Ports 1-8 are assigned to the number keys on the system’s keyboard. If you’ve set no custom assignments yet, then all of these bindings are spelled out in the chart that comes up whenever the F1 key gets pushed. For some systems like GameBoy and its derivates, only the first controller port really matters. Even though these handheld systems actually lacked detachable controllers, mednafen emulates them by mapping them to the first assignment. For most games made for hardware of the 8-bit and 16-bit era, you will only need one or two controllers. This is especially true of public domain NES and Famicom ROM files. Some games used an extender to provide support for more than two controllers. If you’re playing a one-player game, then make sure your wireless or USB controller is connected, and then push ALT, Shift and 1 at the same time. You can also map controls to buttons on a regular keyboard. You will receive a prompt at the bottom, more than likely asking you to map the up control. Push the button you wish to use for up twice. If there was any confusion or if you accidentally pushed two buttons, then the software will prompt you to do it again just as it did in the fast_forward example. Once the up prompt has been satisfied, it will go through the other cardinal directions before asking you for the action buttons associated with said console.
How to Create Custom Profiles and Monitor Specific Configuration Changes in…How to Use Mednafen to Turn Your Linux Box into an ArcadeHow to Set Custom Configuration Features for the GNU nano EditorHow to Monitor Server Configuration using Server Configuration Monitor