The app Titanium Backup (makes backups of all your apps and system data) The possibility to do a Nandroid backup (a whole image of your device, which saves you a lot of trouble should you soft-brick your device)
Rooting an Android device is mostly quite easy, however, rooting procedures vary depending on the device’s manufacturer and model. That is why I limited this guide to Nexus devices only, since the rooting takes the same steps no matter which Nexus you have. The best place to look for a rooting guide for other models is the xda-developer forum. Simply search for your device and you should find a couple of guides helping you through the root process.
How to root a Nexus 4 / Nexus 5 / Nexus 7 / Nexus 10
Note: If you run into any trouble while rooting your device, make sure to check out our rooting first aid kit.
Activate USB debugging
In order to be able to root your device, you need to turn on USB debugging in the “Developer options” menu which you can find in your settings. In case you can’t find that menu, it’s because you haven’t activated it yet. To do so, simply go to “About phone” or “About tablet” in your settings and and keep tapping “Build number” until your device says that you’re a developer.
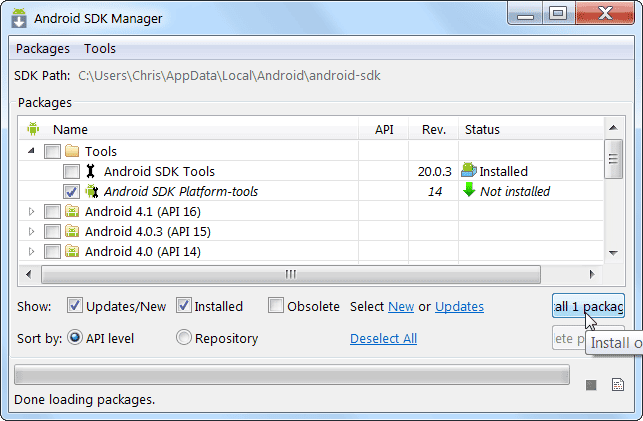
Download Android SDK
In order to use terminal commands to trigger certain actions on your device, you need to download the Android SDK. After that, start up the SDK Manager and enable the Android SDK Platform-tools and click the install button.
Now, to make things easier, copy the “platform-tools” folder situated in the sdk folder and navigate to your username folder, usually situated in C:\Users\YourUsername, and paste it here. If you like, you can rename it to something more memorable such as nexus, for example. The platform-tools folder is important, because it contains the ADB and fastboot tools you need to control your device through a terminal.
Make sure your ADB tool recognizes your device
This is a known obstacle. It can happen that your device is not found by the ADB tool which means that you cannot control it through the terminal. Start your terminal (Start – enter cmd in search bar – enter) and navigate to your ADB/fastboot folder. If you followed the above steps, enter the command cd nexus. Now, enter the command adb devices and see if your device is found. It should pop up like in the image below.
If no devices are shown, there are a couple of approaches to fix this:
Make sure USB debugging is activated Make sure your device is correctly connected to your computer Make sure “connect as a Media device (MTP) is not checked” in Settings -> Storage -> Setting icon -> USB computer connection. Fix the ADB driver for your connected device. The video below explains how to do that in a few easy steps.
Unlock your bootloader
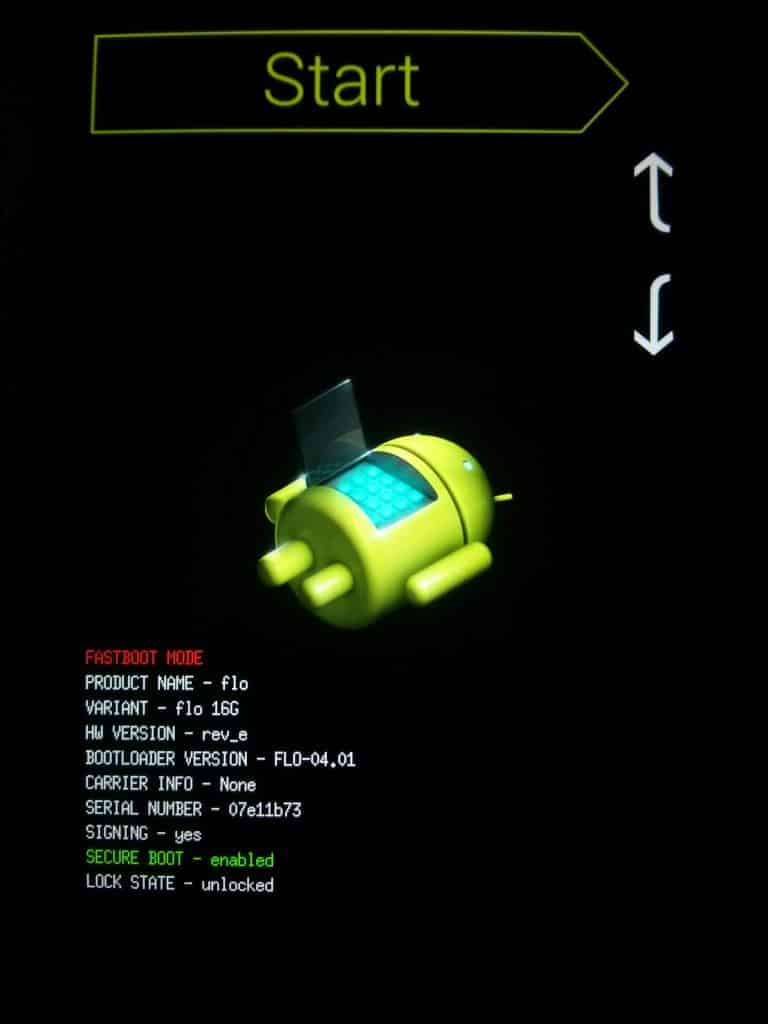
If your bootloader is already unlocked, skip this step. Be aware, unlocking your bootloader will wipe your device and may void your warranty. Make sure to make a backup of your important data. You can check if it’s unlocked by booting your device into the bootloader. Here’s how to do that:
Turn off your device Press down your volume-down button and the power button and keep them pushed until you reach this state shown in the image below. Check the last line where it says “Lock state”. If the following text says “locked” that means your bootloader is locked. Otherwise, it would say “unlocked”.
Here are the steps to unlock your bootloader:
Boot your device into the bootloader (see above for the steps). Open up your terminal. On windows, simply open up your Start menu and type in “cmd” in your search box and hit enter. Navigate to your folder in which ADB and fastboot are situated. If you followed the steps above, then you simply need to put in the command “cd nexus”. cd basically means “change directory”. Now the important part: Type in the command “fastboot oem unlock”, hit enter and confirm the action on your device. Once this is finished, your bootloader is unlocked.
Flash custom recovery
Download a custom recovery. I recommend TWRP or Clockworkmod Recovery, of which I prefer TWRP. After you downloaded the img file, move it to the folder in which your ADB and fastboot files are located. Boot your device into bootloader and use the command in your “terminal fastboot flash recovery RECOVERYFILENAME.img”. That’s it, you can now get into recovery by navigating to it in the bootloader using the volume buttons and selecting it by pressing the power button.
Flash SuperSU
Download SuperSU and move the zip file to the ADB/fastboot folder. Basically, SuperSU goves you the possibility to grant apps root permissions. Boot your device into recovery (see steps above or use the command “adb reboot recovery”). Now, put your recovery into adb sideload mode. To do so, go to “Advanced” (in TWRP). Then, use the command “adb sideload SuperSUFILENAME.zip” to flash SuperSU. That’s it! Your Nexus device is now rooted. If, for some reason, something goes wrong and you soft-bricked your device, don’t worry! Check out our soft-brick first aid guide to get your device back to work.
My thoughts on rooting toolkits
There are toolkits that claim to do all the unlocking and rooting for your in just a few clicks. That may be more convenient than doing all that manually. However, I recommend that you root your device without a toolkit. Doing it manually gives you a better understanding of how the individual steps work and, if something goes wrong, you usually see directly what caused the problem. If a toolkit runs into problems, you usually don’t see at all what went wrong and how to fix it. If you still want to go the easy route, you should try out the Nexus root toolkit from WugFresh. It should work with any Nexus device, but make sure to check the website for more information. I hope that the instructions are clear enough. If something is unclear or if you run into any trouble or have questions, let us know in the comments. Are you interested in more Android related guides? Have a look at our Android knowledge database. I am fro India and I just happened to read this thread. I have a few questions and I appreciate If you could answer them. I purchased a new nexus 5 32 GB. Now, I am afraid to do rooting as it could void my warranty. I would like to know how to install apps to the external storage. Since Nexus 5 comes without an sd card(sealed sd card). How do I access this sd card, becuase If I install any app. It just installs(currently, it tells 350mb and 26 GB free). Now, is this telling me that 350 MB is being used on sd card. Secondly, where can I check the amount of RAM being used ? Regards, Avi Just a Quick question… What if TWRP or Clockworkmod Recovery.img file is not available for my phone model? Is there any common .img Recovery file for flash custom recovery? Quote: Go into Settings/About Phone, scroll down and click on “build number” continuously until you see a toast notification telling you that you’ve enabled Developer Options. Go back to your Settings menu and enter Developer Options, scroll down and click on the “Enable OEM Unlock” checkbox, also make sure you enable USB Debugging while you’re in the Developer Options menu. Δ Contact Us :- trendblog.guest@gmail.com
![]()