Since the initial launch of this post in April 2015, we’ve adapted the content to Fire TV and Kodi updates. The latest version of this guide includes an overview of the new Kodi 16.0 Jarvis features and how to update from previous Kodi-versions without losing settings.
What’s XBMC or Kodi?
Before we get started I would like to give you a short introduction about XBMC and Kodi. XBMC stands for XBox Media Center and was developed for Microsofts first console – the Xbox (duh) – in 2002. The media center software is open-source and available for other systems like Android, iOS, Mac OS X and Windows operating system as a native application. Recently it was renamed to Kodi Entertainment Center, or – in short – Kodi. The software itself offers an endless amount of possibilities: You’re able to stream media locally or from the internet, use the software as a PVR, watch Netflix or listen to music on Spotify, amongst others. Given the open-source nature, there is a sheer endless amount of add-ons and themes which make this tool even more awesome.
Kodi 16.0 Jarvis Features
The next Kodi version 16.0 has been live since the end of February and brings many new features. The features are mostly performance driven and I would definitely suggest you to the newest version. Features include:
DirectX11 support for Windows Skin-development and implementation improvements Audio Digital Signal Processing add-on integration Improved PVR/DVR section 3D effects for menus 4k Improvements for devices running Android (e.g. the Fire TV/ Fire TV Stick) Add-on manager cleaned & improved Improvements to audio and video playback in general
As you might expect, the Kodi team is already working on the version after called Kodi 17.0 Krypton.
Requirements for running Kodi (XBMC) on a Fire TV or Fire TV Stick
Getting Kodi installed on your Fire TV (Stick) is quite easy. There are two ways of doing this, either via ADB or using ES File Explorer directly on your Fire TV. You’ll only need the following things:
ADB drivers (Mac – Windows) for regular installation Fire TV (Stick) with developer options enabled Latest Kodi APK (ARM version – currently version 16.0)
How to install Kodi (XBMC) on a Fire TV
While you can also use this simple toolkit, this guide will show you how to install Kodi manually. In these first few steps we’ll make sure that your Fire TV is prepared and you’ve downloaded and installed all necessary files.
Install the ADB drivers for your operating system linked above Navigate to your Fire TV Settings. Go to System —> Developer Options Enable ADB Debugging and Apps from Unknown Sources Go to System —> About —> Network and write down the Fire TV IP Address Download the latest Kodi version (ARM Android release)
Alright. Next we’ll actually go ahead and install Kodi.
Open your terminal (Mac) or command prompt (Windows) Navigate to the directory where you stored the Kodi APK Run these commands
The window should return something along “connected to Fire-TV-IP-Address-here” Next, run the following command
The installation is done when the window returns success
You’ve now installed Kodi on your Fire TV – Easy right? But the story doesn’t end here. Unfortunately the Fire TV has some issues with streaming 1080p content out of the box. Your side-loaded Kodi installation also does not have a shortcut on the Fire TV home screen – but we’ll also take care of that.
How to install Kodi (XBMC) on a Fire TV without ADB or a Computer / Mac
In case you don’t want to use the toolkit or ADB, there is a third way of installing Kodi on your Fire TV without access to a computer or Mac. You are able to install an Android File Manager like ES File Explorer on your Fire TV and use this program to download and install the Kodi APK. It is recommended to use a bluetooth mouse and keyboard, however, this is also possible using the regular Fire TV remote.
How to update to Kodi 16.0 without losing Settings
Installing Kodi 16.0 Jarvis on your Fire TV is quite easy and can be done in a few minutes. Since it’s a new version and not a small update, you can simply flash the APK file. After the first launch, Kodi will import all settings from your previous installation. After the successful transfer and initial launch, you can simply go ahead and delete to old version from your Fire TV. Here are the single steps you have to take to achieve this:
Download the latest Kodi APK (Android ARM, version 16.0 as of February 2016) Open your terminal (Mac) or command prompt (Windows) Navigate to the directory where you stored the Kodi APK Run these commands
The window should return something along “connected to Fire-TV-IP-Address-here” Next, run the following command
The installation is done when the window returns success Launch Kodi 15.12 The app will now import settings from 14.2 Optional: Delete Kodi 14.2 from your Fire TV
That’s it. Enjoy the latest version of Kodi! The steps mentioned above also apply to installing the latest Kodi 16.0 Release Candidate.
How to make your Fire TV run 1080p MKVs without buffering issues
My Fire TV is connected via WiFi to my NAS – in theory enough speed to stream large media files. However, I usually ran into buffering issues every 5 to 10 minutes. The solution to this problem is pushing a proper advancedsettings.xml file to my Fire TV as well as switching from a wired LAN connection to a wireless one. There are three different versions out there which I will share with you here: Advanced Settings Version 1 Advanced Settings Version 2 Advanced Settings Version 3 Advanced Settings Version 4 (recommended, best working version for me) I would personally suggest trying them step by step and stick with the one that works best. For me it’s version 4. While usually a wired connection should work better, in my case the WiFi option resulted in a stable connection to stream local media. To push this file to your Fire TV, you have to do the following
Download the advancedsettings.xml to your computer Remove the number (1, 2, 3 or 4) from the file name Open your terminal (Mac) or command prompt (Windows) Navigate to the directory where you stored the advancedsettings.xml Run these commands
The window should return something along “connected to Fire-TV-IP-Address” Next, run the following command
Once completed, the window will return something like this:
Restart Kodi and test if everything works fine. That’s it!
How to create a Kodi (XBMC) shortcut on your Fire TV home screen
After side-loading Kodi to your Fire TV (Stick) you won’t have a shortcut on your home screen. After installing the APK you can only access the media center using the settings menu. However, there is also a workaround for that.
The window should return something along “connected to Fire-TV-IP-Address” Next, run the following command
The installation is done when the window returns success Next, open Llama (Settings —> Applications —> Llama) Go to EVENTS and click the “+” in order to add a new event Click to ADD CONDITION, select Active Application and Choose App. Select the TV app installed earlier Next, navigate to ADD ACTION and choose Run Application. Select Kodi. You’re done. From now on, whenever you launch the TV app on your home screen Kodi will load.
This should be it for the initial Kodi (XBMC) setup. You’re now able to add media content to your library using a variety of connections such as Network Filesystem (NFS), UPnP or Windows Network (SMB). I wouldn’t recommend to use UPnP as this will restrict Kodi from adding meta content.
How to add media content to your Kodi library
Kodi allows to add different media such as tv shows, movies or music to your library. Out of the box, Kodi supports a variety of media sources including network storage / file sharing or internet streams. The most popular network storage solutions are NFS (Network File System), SMB (also known as Windows File Sharing) and UPnP (Universal Plug and Play). It does not matter if you media files are served from a dedicated NAS or a computer in a network, I would recommend using NFS over SMB and UPnP. NFS offers a lower protocol overhead and simpler user authentication. So what does that mean? Higher transfer speeds (=less lag / stutter when streaming video) plus less work for your network, i.e. you’re not killing all network transfers. Additionally, adding media trough UPnP prevents Kodi / XBMC from adding meta data like IMDB rating, cover picture or plot.
So how do you actually add media to your library? By default, every root directory should have an Add Sources option. Additionally, opening the context media (menu button) in the root directory will offer the option to add sources from there. Just follow the menu and add your media source. Again, I can only emphasis to use NFS over SMB and avoid UPnP.
Next, Kodi will ask you which type of content source you just added. Go ahead and set the appropriate one, choose a scraper (source from which meta information like cover, plot, IMDB rating, etc. will be loaded) and hit OK – Kodi will do the rest for you. Unfortunately, Kodi / XBMC sometimes has issues with getting the correct data. This can be avoided using proper file names according to the official guidelines.
How to automatically rename movies and TV shows for Kodi / XBMC
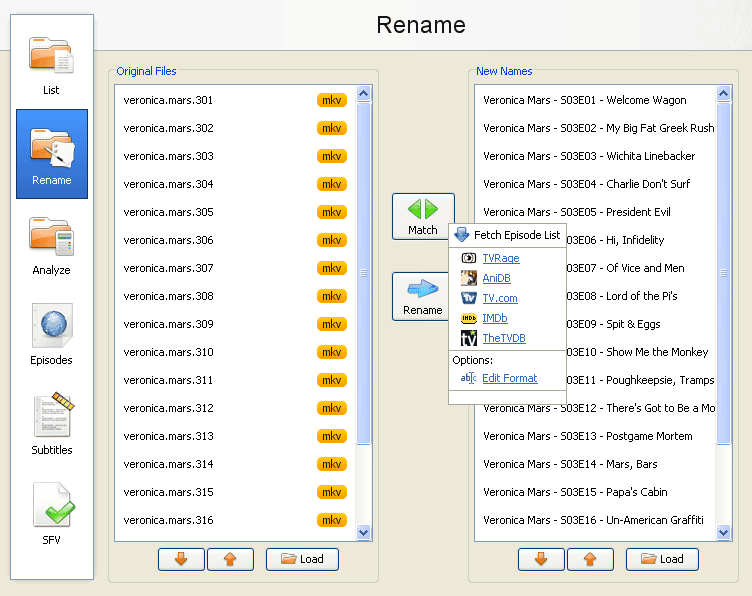
If you’re having issues with Kodi / XBMC not properly crawling meta data for movies or TV shows in your media library, the reason for this might be your file name structure. For movies, it is suggested to only use the full movie title including the year of release in brackets (e.g. The Interview (2014)). In case of TV shows you should have them all in separate folders, using the following structure: Name – SeasonxEpisode – Title (e.g. Family Guy – 4×03 – Blind Ambition). However, doing this one by one can get quite annoying with an extensive movie and TV show database. The solution for this is a small app called FileBot which offers native apps for the most popular platforms, including Mac OS, Windows or Linux.
Simply add your media directory using the load button, hit match and select a scraper from the list and confirm with rename once FileBot is done. It’s simple like that. All files will be renamed properly and after refreshing your Kodi media library all meta data should be downloaded properly.
How to automatically update your media library
Now that we’ve properly added media to your library, there is one little thing that we need to take care of: Automatically updating Kodi’s media library when you add new content to your hard drive or network storage. Luckily, there are two add-ons which take care of this. Watchdog will constantly check your media source for new files and automatically update the Kodi / XBMC library when new content is available. If you want to scan your media source for new content on a specific day or time, XBMC Library Auto Update has you covered.
How to install skins or themes
Installing skins / themes on your Fire TV is pretty easy. Kodi offers the possibility to download and install skins from within the settings menu, just follow these steps:
Best Fire TV skins / themes
Next to an endless amount of add-ons, XBMC / Kodi also offers the possibility to add skins / themes. Thanks to the 2 GB of RAM your Fire TV is able to run heavy skins. Next to Confluence, the Kodi standard skin, there are plenty of alternatives available. Here’s a selection of the most popular skins for Kodi.
Eminence
Amber
Ace
Aoen Nox
Questions? Share them in the comment section below.
Images courtesy of Kodi / XBMC and FileBot
1 20971520 10
Before, the video would stop every few minutes and I’d see “Buffering…. XX%” at the bottom of the screen. Sometimes it would take a few seconds for it to reach “100% and resume. Other times, up to a minute.
50 shades of grey cast
50 shades of grey trailer
50 shades of grey box office collection
50 shades of grey release date
50 shades of grey IMDB
50 shades of grey box office predictions
Happy Lohri Quotes
IDM optimizer
Valentine’s Day Ideas
Valentine’s Day Ideas for Her
Valentine’s Day Ideas for Men
Valentine’s Day Quotes
Valentine’s Day Poems
Valentine’s Day Images Wallpapers Pictures
Valentine’s Day Cards
You can also see the Full List of Nominations for Oscars 2015.
Watch Hobbit The Battle of the Five Armies Full Movie Online Free
Watch Seventh Son Online Free
The Walking Dead Season 5 Episode 9
The Walking Dead Season 5 Episode 9 Full
2015 academy awards live streaming
Will air on 22 feb
Academy Awards 2015 Live
Watch Game of Thrones Season 5 Episode 1 Online Game Of Thrones Season 5 Episode 1 Online free Game Of Thrones Season 5 Episode 1 Online Free Watch taken 3 movie online free Watch Avengers 2 Online Movie Free Watch Cinderella Online
Cinderella Full Movie
watch games of thrones season 5 episode 1 online
i have read this article completely and really you have clear in the above article that we cooperate Fast And Furious 7 Torrent
Ek Paheli Leela Torrent
Watch Game of Thrones Season 5 Episode 1 Online
Mayweather vs Pacquiao Live Stream
Furious 7 Full Movie
Cinderella Full Movie
Mayweather vs Pacquiao Live Stream HD 2015
games of thrones season 5 episode 1 Watch online
watch pacquiao vs mayweather 2015 live stream
mayweather vs pacquiao live stream
games of thrones season 5 episode 1 Watch online
watch pacquiao vs mayweather 2015 live stream
Watch Mad Max Fury Road Online Free
Watch Pitch Perfect 2 Movie Online
Watch Mad Max Fury Road Movie Online
Watch Pitch Perfect 2 Movie Online
Watch Pitch Perfect 2 Movie Online
Watch Pitch Perfect 2 Movie Online
Watch Mad Max Fury Road Online Free
Watch Pitch Perfect 2 Movie Online
watch payback 2015 live stream
watch payback 2015 online
watch payback 2015 live stream
watch payback 2015 online
Watch games of thrones season 5 episode 10 online
Now here is a question for Philipp, why do we have to push the .xml through adb and not just plug the fire stick to the computer and browse to the destination folder and replace?
Does anyone has similar problems?
Thanks!
Δ
Contact Us :- trendblog.guest@gmail.com