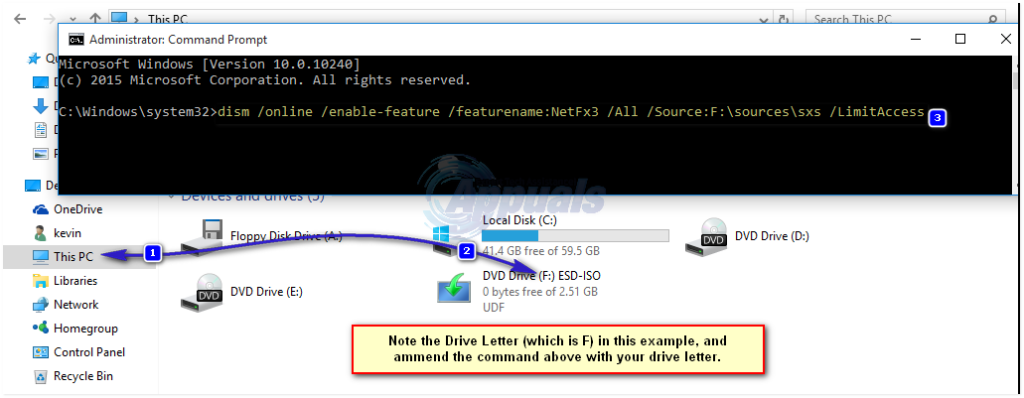
Even though many new versions of the .NET Framework have come out since version 3.5 was the norm all across the globe, many still consider .NET Framework 3.5 to be one of the most stable and overall best versions of the .NET Framework in existence. Many Windows users, including Windows 10 users, sometimes want to downgrade to .NET Framework 3.5. Well, here’s how you can downgrade to .NET Framework 3.5 on Windows 10 even if you don’t have an internet connection (although you are going to need a Windows 10 installation medium): Insert your Windows 10 installation DVD into your computer. If you don’t have a Windows 10 installation DVD, you can use a Windows 10 installation USB instead. If you don’t have a Windows 10 installation USB either, you can create one using this guide. If you don’t have a USB, download the Windows 10 ISO file (search Google) and mount it by Right-Clicking and choosing Mount. Launch File Explorer and navigate to This PC in the left pane. Locate and make note of the drive letter that your computer has assigned to the Windows 10 installation DVD or USB you inserted into it. Close the File Explorer window and right-click on the Start Menu to open the WinX Menu. Click on Command Prompt (Admin) in the contextual menu to launch an elevated Command Prompt. Type the following into the elevated Command Prompt and then press Enter: Note: Replace the X in this command with the drive letter assigned to your Windows 10 installation medium.
Wait for the command to be fully executed, and once it has, your computer’s .NET Framework will have been downgraded to version 3.5. If you would rather not go through the hassle of manually performing all of the steps listed above, there is a simpler solution for you. You can simply download this .bat file that contains a batch file that has been designed to locate the drive letter of your Windows 10 installation medium automatically and then perform the rest of the steps listed above in your stead, extract the .ZIP file to a location on your computer such as your Desktop, right-click on the uncompressed batch file named Install .NET Framework 3.5 via DISM, click on Run as administrator and then sit back and relax while the batch file identifies the drive letter for your Windows 10 installation medium and then proceeds to downgrade your computer’s .NET Framework to version 3.5. If you get an error, 0x800f081f (The source files could not be found), then open the drive containing windows 10 installation files, and go to the \Sources\SxS folder. See if you can find a file, containing the .net 3.5 cabinet file, if yes, then take note of the full name of the file, and execute the following command via command prompt (admin).
FIX: Error 0x800736B3 installing .NET Framework 3.5 on WindowsMicrosoft update KB4345421 totally breaks .NET Framework, no workaround…How to Fix .NET Framework 3.5 Installation Error 0x800F0922How to Fix Error 0x800F0950 .NET Framework 3.5 Installation