A boot loop problem basically renders a device unusable, which is every HTC One M9 user who has ever come across it has wanted to get rid of it immediately. In the case of the HTC One M9, the boot loop problem is way more common in devices that have been rooted rather than devices that have not been rooted. In stock devices, a boot loop problem is almost always unfixable and caused by a hardware defect. However, in rooted devices, the problem is most commonly caused by either a faulty custom ROM installation or, in some cases, the rooting of a device through a custom TWRP recovery, and can be fixed. The following are the two solutions which have proven to be triumphant over the HTC One M9 boot loop issue:
Solution 1: Wipe the device’s cache clean
- Power the device down.
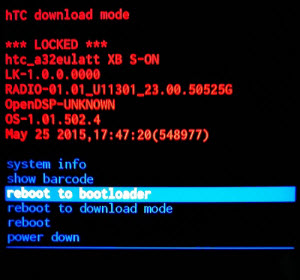
- Press and hold the Power and Volume Down buttons at the same time. Once the screen turns on, let go of the Power button but keep pressure on the Volume Down button until a black screen with red and blue text appears.
- Use the Volume Down button to highlight the ‘reboot to Bootloader’ option and the Power button to select it.
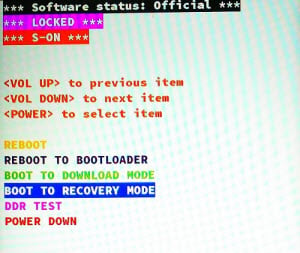
- In the Bootloader, use the Volume keys to highlight the ‘BOOT TO RECOVERY’ option and use the Power button to select it.
- In Recovery Mode, use the Volume buttons to highlight the option named ‘wipe cache partition’, use the Power button to select it, and then confirm the action.
- Once the cache partition has been wiped, perform the last step again, this time selecting ‘wipe dalvik cache’ instead of ‘wipe cache partition’.
- Finally, reboot the device into the Android OS by selecting the ‘Reboot System Now’ option.
Solution 2: Perform a hard reset
- When the HTC One M9 is stuck in an infinite boot loop, its settings menu cannot be accessed, which means that the user will have to perform a hard reset on the device through Recovery Mode. Firstly, the user will have to shut the HTC One M9 down.
- Press and hold the Volume Down button, and while doing so, press the Power button until the device vibrates and then release it. 3. Continue pressing the Volume Down button until a black screen with red and blue text can be seen
- Use the Volume Down button to highlight ‘reboot to Bootloader’ and the Power button to select it.
- In the Bootloader, use the Volume Down button to highlight ‘BOOT TO RECOVERY MODE’ and the Power button to select the option.
- Once a screen with an image of the HTC One M9 displaying a red exclamation mark within a red triangle appears, press and release the Volume Up button while holding down the Power button. The device will then boot into Recovery Mode
- Once in Recovery Mode, use the Volume Down button to highlight the ‘wipe data/factory reset’ option and the Power button to select it.
- On the next screen, highlight and confirm the ‘Yes – delete all user data’ option.
- Once the device has been reset to factory settings, reboot into the Android OS by navigating to and selecting the ‘reboot system now’ option in Recovery Mode.
Solution 3: Install root through a .zip file instead of a custom TWRP recovery
- When flashing a ROM from a custom TWRP recovery, flash the ROM and wipe the device completely as described in the first solution.
- When TWRP offers to install root, decline.
- Instead, flash SuperSU onto the device from a .zip file.
How to Root the HTC U11 and HTC U11 PlusFix: HTC One M8 Not ChargingFIX: HTC One M9 Auto Rotate IssueFIX: Samsung Phone Stuck in Boot Loop and Wont Turn On